ChatBox V3
ChatBox V3 is essentially an animation system for VRC's ChatBox and the culmination of feedback and suggestions from the community. It provides an extensive featureset to let you customise the way the ChatBox looks in-game from any ChatBox-enabled module that's offered. Below is an explanation of how the different features work and some example setups. There are also ChatBox V3 configs in the chatbox-config forum channel on the Discord server.
While going through this guide do note that you can enable and run modules and then switch to the ChatBox screen to get a live preview in-game of what the ChatBox is doing.
Keywords
- Timeline - The bottom half of the screen where all Clips are kept
- Layer - A single part of the Timeline. 8 layers are stacked make the Timeline
- Clip - A single part of a Layer that is associated with modules. Can be dragged and resized horizontally and moved up and down by right clicking
If you need help
If the explanation or examples don't make sense to you feel free to reach out on the Discord Server and I'll be more than happy to run you through how it all works so that you can achieve what you want.
Formatting
Each format for a state or event can have the following keys to aid with formatting:
- /n - Adds a new line using the previous method of padding with spaces, but this automatically calculates the correct number of spaces dynamically
- /v - Adds a new line using the newline terminator which saves on character spaces but shrinks the width of the ChatBox in-game to the maximum line width
Importing/Exporting Configs
Using the in-app Import and Export buttons is recommended, but if they don't work for whatever reason the ChatBox V3 config can be found at %appdata%/VRCOSC and given to people so they can have your ChatBox V3 setup. They can paste the config file and restart VRCOSC to load it up.
Inside the chatbox-configs forum channel in the Discord Server some users have shared their configs for ChatBox V3.
Quick Start
For the majority of people the default Timeline will work fine with your chosen enabled modules. Timeline edits can be made by right clicking on the Clips (the rectangles in the bottom half of the screen) to delete Clips. Right clicking an empty space in the Timeline will let you create a Clip. Improvements to the movement and management of Clips will come in the future.
Default Timeline
When starting the app from version 2023.423.0 onwards, you will be setup with the default Timeline. Any edits you make to the Timeline will then be saved. The default Timeline is aimed at trying to make ChatBox V3 behave the same as ChatBox V2 if no customisation was done to either systems.
Simple Edits
You can make simple edits to any of the default clips by clicking on them and altering their formats. If you don't want to show anything that is a part of the default timeline, either disable or remove the clips you don't want.
Docs
The following subsections are an explanation of how ChatBoxV3 works. I've tried my best to explain it as simply as possible but feedback is always welcomed, and as always if you're confused you can join the Discord Server and ask for help.
Timeline
The Timeline is the main feature of ChatBox V3 as it allows you to customise when and how Clips interact with each other and the ChatBox in-game.
Creating Clips
The Timeline has 8 layers, also known as priorities. Right clicking on a layer will give you the option to create a new Clip on that layer. The new Clip will fill the empty space between other clips, or between the bounds of the Timeline.
You can drag a Clip left and right on the layer, and right clicking on a Clip will give you the option to move the Clip up or down a layer, or delete it. Do note that you can only move a Clip up or down a layer if there is space (Improvements to the Timeline dragging system will come in the future)
Timings
The Timeline lasts 60 seconds by default (Similar to V2's default settings), whereby every 60 seconds the Timeline will loop back to the start. Clips that are present on the timeline are snapped in intervals of 1 second. You can adjust the length using the control in the centre of the screen
Clips
Clips are a way of managing the text of the ChatBox at a certain point in time, based on evaluation of associated modules' states and events.
For example, if I create a Clip on the top layer and tick the Media module, the Clip is now registered as following the states and events for the Media module.
States and Events
Each state and event has a checkbox in the top right. This indicates whether you care about that state/event.
Using our example from earlier, if we only tick the Media - Playing state, and leave the Media - Paused state unticked, that means that for this Clip to be valid the Media module must be in the Playing state. If it is, the format is used and sent to the ChatBox. If the Media module is in the Paused state, the ChatBox is cleared as the Paused state is unticked (This is the same as Paused Behaviour from V2 being set to Empty).
Events take priority over states. If an event occurs, even if there is a valid state, the event will display for the time set by you.
If 2 events from the same module occur, then the latest event will replace the current event. However if 2 events from different modules occur, then they will queue.
Multi-module Clips
All Clips are allowed to have multiple modules associated with them. This is what allows for multiple module variables to be put into the same Clip.
When multiple modules are associated with a Clip, states are compounded together to give you ultimate control over what to show in the Clip no matter what state any of the associated modules are in.
For example, if we tick the Media and Clock module, the only states that will occur are:
- Media - Playing & Clock
- Media - Paused & Clock
This is because Clock only has a single default state.
However, if any module you have ticked in the "Select Modules" is disabled in the module listing screen, the states that contain that module will be filtered out by the "Show relevant states only" button. Unticking this will show you all the generated states however it's recommended to keep this ticked as it shows you how the Clip will behave when it's running based on the enabled modules in the listing screen.
Validation
As mentioned earlier, Clips are evaluated for their validity at the Timeline's current time. The following steps are done to evaluate a clip:
- Is the Clip Enabled?
- Is the Clip covering the Timeline's current time?
- Is there currently a triggered event that is ticked OR are all the modules that are associated with a clip in a state that is ticked?
If a Clip is deemed invalid then the ChatBox will check the next priority down for a valid Clip. If no valid Clips are found, the ChatBox will be cleared.
This evaluation step is done based on the ChatBox Time Span setting in the settings screen. VRC's default is every 1.5 seconds.
Example Setups
Media - Now Playing Event
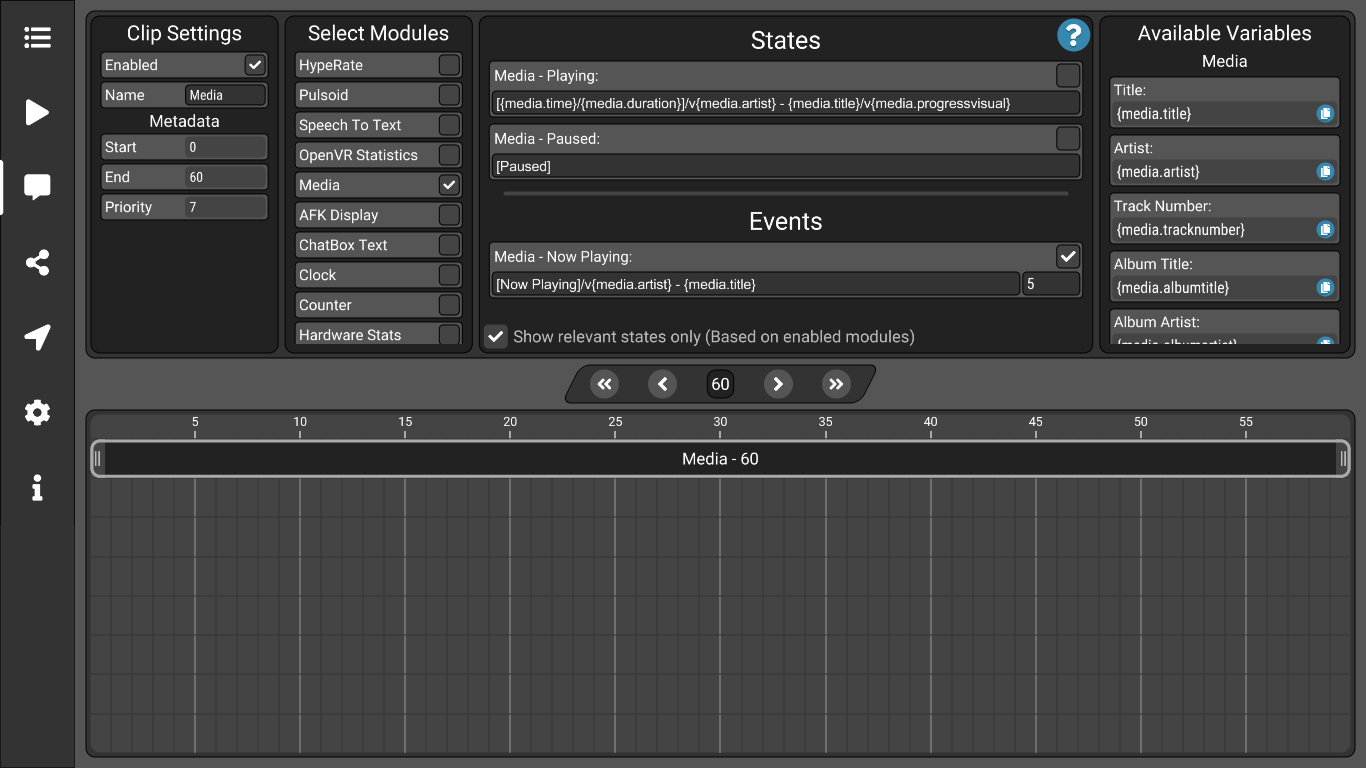
In this example, you can see that the "Media - Now Playing" format will only be put into the ChatBox if the "Media - Now Playing" event occurs, and will be shown for 5 seconds. The "Media" Clip covers the entire Timeline to allow this event to be triggered any time.

Multiple Clips
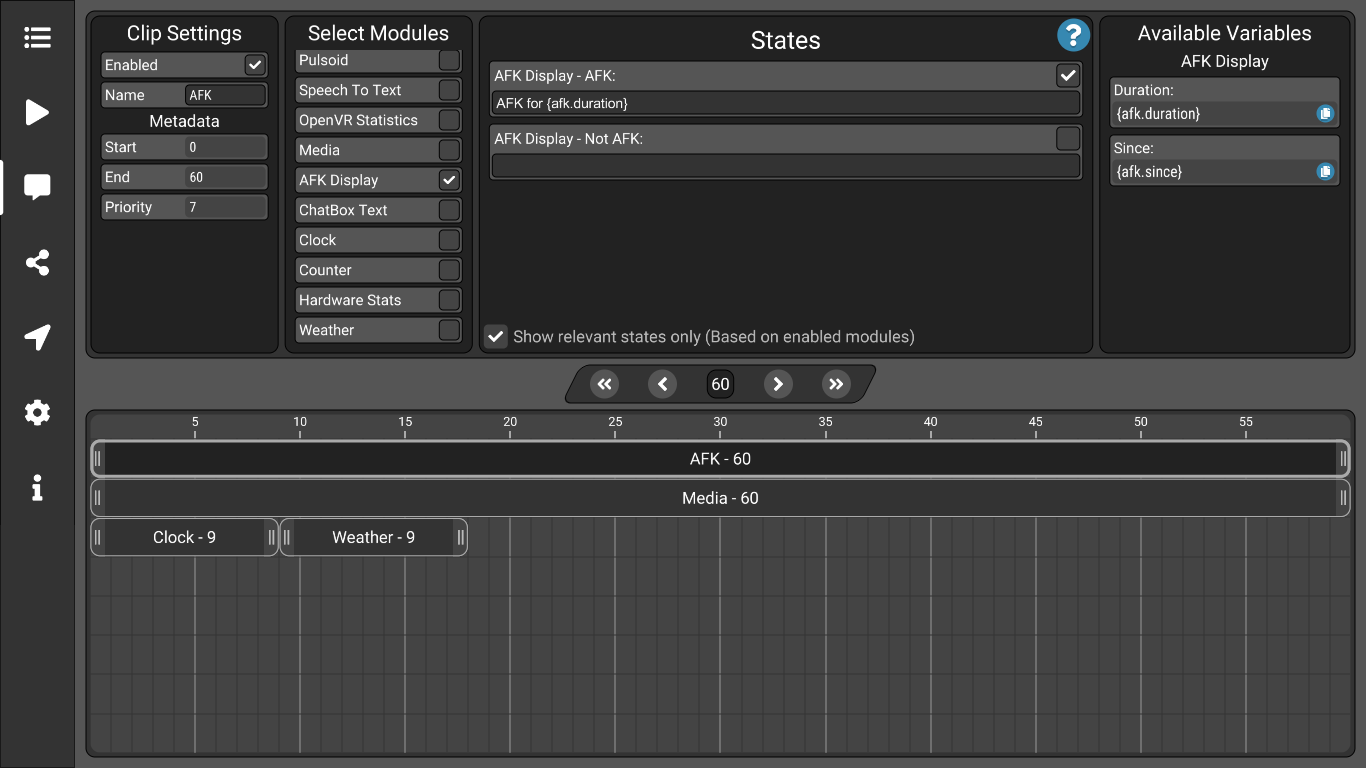
In this example, there are 4 Clips.
As the AFK state only occurs when VRC's AFK animator parameter is set to true, this means that if you aren't AFK in-game the "Not AFK" state is used. Because the "Not AFK" state is unticked the "AFK" Clip is marked as invalid.
This then goes down the priority list into the "Media" Clip (see above for how that's setup). If the "Media - Now Playing" event isn't occurring, the "Media" Clip is also marked as invalid.
That means that the "Clock" and "Weather" Clips are the only ones left and will show for 9 seconds each one after the other before the ChatBox is then cleared for the remaining 42 seconds (Remembering that if either the "Media - Now Playing" event occurs or I go AFK then the ChatBox shows them as they are higher priorities and their respective Clips become valid)
